Mainsail Trimming

by Paul Eldrid OneSails Australia

Congratulations!

Your new OneSails Mainsail has been designed specifically for your boat using some of the best software and talented sail designers in the world. It has been crafted from the finest materials and built with the precision of the passionate sail makers at OneSails. Your local OneSails representative will be happy to assist you with setting up your new sail.

Before we get started there are a few important things to consider:

  1. Go to www.onesails.com and download the OneSails Tuning Diary. Every time you go sailing you could be recording valuable information that WILL help you improve your boat speed and performance over time
  2. Caring for your sails is important! Release the leech cords, foot cords and batten tensions after you sail each time. This way after racing your sail will ‘relax’ better while it waits for its next race
  3. Never fold your sail in the same place every time – try and avoid hard fold points
  4. Try and store the sail completely dry and in a dry place
  5. Never stow a sail in a crumpled or crushed manner
  6. If your sail has slides or luff cars lubricate them every 6 months to prevent corrosion
  7. If the sail has a bolt rope inspect and service the top part to ensure smooth feeling into the foil
  8. Regularly check all telltales and leech ribbons are in good order – without these trimming is difficult
  9. Make sure the sail is used in its designed wind range as taking the sail outside the range can lead to premature aging or even failure in extreme cases
  10. Take tape and marking pens with you when you sail. Calibrating your boat is very important for your on board reference and also to record later in your OneSails Tuning Diary

Eldrid super tip - by keeping a sailing diary you can learn the best settings for your boat and your sails which improves your boat speed. Involve all of your team in writing some notes after every time you sail and you will soon have a detailed database. If you then need to discuss your performance or new sails with your OneSails sail maker you have all the information you need.

Luff Tension - Halyard & Cunningham (downhaul)

Your designer will have designed your sail with particular maximum depth, maximum camber position (draft), entry angle, the wind range of the sail, the material used in your sail and the amount of mast bend you will encounter (with varying backstay tension).

As a general rule the more wind you have the more luff tension you should apply, particularly when sailing hard on the wind. This is largely due to the sails maximum draft moving back as the sail loads up. Factors that contribute are stretch, mast bend (via backstay or mainsheet load) and also mast setup including spreader angle and rig tension.

In light conditions a few wrinkles on the luff of your sail is ok, but too much tension could see the sail have a distinctive ’knuckle’ in the front. As soon as the wind increases and the sail loads up remove the wrinkle and continue to add luff tension as the sail moves up its designed wind range.

Avoid over tensioning the luff before checking with sheet tension as this will add to the life of your sail.

Eldrid super tip - as a guide, set your halyard tension for the sail to set best in its downwind position – then for upwind use your Cunningham to adjust the required luff tension. It is a good idea to mark your halyard with luff tension marks, this way you can easily repeat fast settings and accelerate set up times when racing.

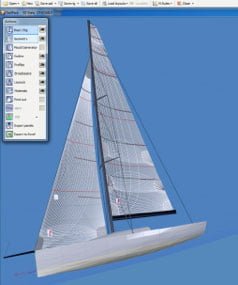
Luff tension in light winds – you can see here wrinkles on the luff with minimum halyard and no Cunningham (downhaul) tension. This design can be seen also below with different luff tensions…

…adding outhaul tension flattens the bottom of the sail – compare the draft stripes above to see the difference in sail shapes between less tension (left) and more (right). Also note the straighter exit in the lower third of the sail...

Outhaul Tension (foot)

The outhaul position on most boats adjusts foot tension on the sail. Different conditions will see you treat the Outhaul differently. As a general rule at the lower end of your sails range you will have the Outhaul eased to keep the bottom of the sail more powerful.

As the wind increases and the boat no longer needs all the power the Outhaul is gradually tightened to flatten the foot. This achieves two primary functions, firstly with the sail becoming flatter there is less drag so therefore the aerodynamic profile of the sail becomes more efficient and the boat goes faster. Secondly the reduced exit angle allows the accelerated air to exit quicker which reduces rudder load and therefore weather helm…thus reducing hydrodynamic drag.

With the sail now flatter, there is less distance between the leech of the jib and the mainsail (commonly referred to as the ‘slot’) – the air can now pass quickly through both, reducing drag & creating less disturbance on the mainsail….again adding speed!

…adding outhaul tension flattens the bottom of the sail – compare the draft stripes above to see the difference in sail shapes between less tension (left) and more (right). Also note the straighter exit in the lower third of the sail...

…and now from behind, compare the draft stripes above to see the difference in sail shapes between less outhaul tension (left) and more (right)…again note the straighter exit in the lower third of the sail on the right.

Eldrid super tip - as soon as you are maximum powered flatten the foot. This will ensure you don’t develop excessive weather helm. The boat will not want to round up as much in gusts and your heel angle will become consistent…this makes a huge difference to your average speed.

Mast Bend (backstay tension, spreader angle / rig tension)

As we know a fuller sail is more powerful so this can work as much for your boat speed as it can against you. In lighter winds with a straight mast you can create a very powerful mainsail but as soon as the breeze increases the sail needs to be flattened not only with outhaul but also by tightening the backstay.

On boats with running backstays with deflectors or checkstays this does the same thing. As a general rule start with little or no backstay in light conditions to have the sail full and powerful. As the wind increases keep tightening the backstay to bend the mast and flatten the mainsail. The tension will also help your headsail shape too – as you pull the backstay on the forestay tension will also increase.

Forestay sag is considered the enemy once the boat is powered up as it effects how close the boat can point to the wind and adds unwanted depth…exactly the same as a mainsail too full therefore dragging the boat’s aerodynamic profile and slowing it down.

When the mast bends (left) the sail has to go with it! There is “luff curve” designed into your mainsail so that when your mast bends, your sail can cope with this bend and flatten without ‘starving’. Too much bend, or not enough luff curve can cause large creases from the mast to the clew and a lack of control of the leech. Too much luff curve or mast too straight will result in a deep sail that can’t be flattened. This is very important. One Design and Olympic dinghy’s go to extraordinary lengths to get this relationship perfect. A keelboat should be no different! Rig settings before you hit the course are as important as trimming the sails whilst racing.

Eldrid super tip - your backstay should be calibrated and if you are using a simple purchase system you can still use a tension gauge to record the load of your backstay for each of your marks. If your backstay is hydraulic get to know how many PSI each of your marks is. If you have a load cell be sure to record your kg settings in your OneSails Tuning Diary!

Straight mast (left)…with minimal backstay or pre-bend by spreader angles / rig tension the mainsail sets up deep and powerful. With mast bend (right) the sail flattens and also twists easier…again note the straighter exit in the lower third of the sail on the right.

Sheet Tension (twist)

Being the primary control on any sail the sheet is the most important and most frequently adjusted. The amount of wind, the sea state and how the boat is behaving will determine how much sheet tension is applied. The mainsheet not only pulls the sail in and out, but controls how tight the leech is. The profile the leech assumes is known as ‘twist’. The more power you want, sheet harder and reduce twist and visa versa.

As a general rule, in light air you will need twist to let the sail ‘breathe’, then as the wind increases the more sheet tension is applied. Too much when the wind is light and it will definitely stall and your leech ribbons will show this. Too little and the boat will not ‘point’ (sail close to the wind). Remember that the fins below you (keel and rudder) also need flow for the boat to work too! When trimming the main go for boat speed first so your foils get a grip on the water then trim the sheet on gradually to get the height. It is very important to do this in and out of manoeuvres, for example tacking and starting and also through changes in wind speed and in gusty conditions.

As the boat powers up you can continue to sheet firmer even to the point when your leech ribbons start to stall. As soon as the boat is fully powered or at maximum heel angle you will need to start to depower. The sheet is the quickest way to make these changes but remember to adjust your outhaul and backstay as outlined above.

Mainsheet controls the leech tension and ‘twist’ of the sail –top images show more sheet tension and less twist. Bottom images you can see less sheet and a more ‘open leech’ – or less twist.

Eldrid super tip - look up! The most important thing to look for when sheeting the main on is looking up to see the twist and the leech ribbons. For light airs work on the top ribbon working 100% of the time, in medium air 50% and for heavy airs 100%. Also keep an eye on the sail if it is back-winding…if so flatten the sail aggressively. If the sail looks like it is floating around and is unsteady a solid pull on the Cunningham will settle it down.

Traveller Position

Most boats have a traveller which adjusts the position of the clew (via the boom) relative to the centreline of the boat. This effectively alters the sheeting angle (angle of attack) that the mainsail meets the wind. By having the traveller ‘up’ the boom will be on the center line and the boat will power up and point high. To de-power the traveller can be eased out taking the boom to leeward, thus reducing the angle of attack and reducing power. Easing the traveller also works for sailing lower and or faster.

As a general rule in light winds you have the traveller set to windward thus allowing you to use soft sheet tension to keep the leech twisted in the top without stalling it. As the breeze increases and more sheet tension is applied the twist reduces as it is pulled on and set close to the center line increasing pointing ability and power. Only start easing the traveller when you are at maximum heel angle and you need to de-power. Make sure all other controls have been used at this time - maximum mast bend (backstay), maximum outhaul, Cunningham on and the sail is as flat as you can make it.

The traveller is an easy and effective way of fine tuning the mainsail in and out of gusts to maintain a constant heel angle and high average speeds. Often mainsheet loads are very high and can be difficult to make small adjustments for every gust – for this the traveller is perfect. It is VERY important to consider the slot between the main and the jib when dropping the traveller. If you are easing the traveller to de-power make sure the main is flattened first – or it will backwind from the jib as the slot closes.

Leech Ribbons & Telltales

Leech ribbons indicate the amount of flow that has made it to the leech around both sides of your sail. This ‘flow’ is what generates lift, making your boat move forwards. It also makes aeroplanes fly…no flow = no go! LEECH RIBBONS ARE THE MOST IMPORTANT WHEN TRIMMING THE MAINSAIL. Telltales are a reference as to how the wind is flowing across your sail. They should be used as a reference to your sails trim but not over analysed as the pursuit of perfect, even flow may see the sail trimmed without consideration for the power, heel angle, sea state and ease of steering for the driver.

As a general rule in light winds the goal is to have the TOP LEECH RIBBON flying horizontal which indicates you have flow across the sail all the way to the leech. This can be difficult in very light air – but make this your goal! Approaching medium winds the TOP LEECH RIBBON should be flowing around 50% of the time, indicating you have maximum sheet and maximum power. The air is working hard to get all the way around the sail generating maximum power or ‘lift’. In strong winds (or as soon as the boat needs to be de-powered) the TOP RIBBON should again be flowing 100% as with all leech ribbons. The air should be rushing through the sail and getting out quickly with minimum drag around your sail. At this point any telltales in the middle of the sail may be lifting vertically – this is normal as the sail is flattened (backstay on), angle of attack is reduced (traveller down) and the boat is ‘feathered’.

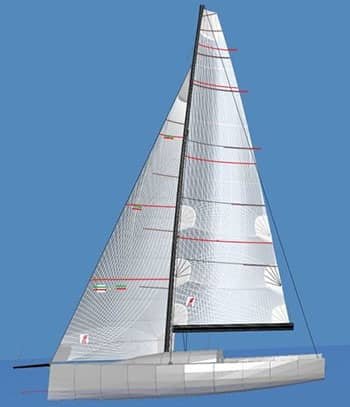
Light winds – Top Ribbon 100% streaming

Medium winds – Top Ribbon 50% streaming

Heavy winds – Top Ribbon 100% streaming

Eldrid super tip - in some conditions especially light winds it may be difficult to get all the ribbons to ‘fly’. Start at the top and work your way down – never sacrifice the top for the bottom! The TOP RIBBON IS THE MOST IMPORTANT IN THE WHOLE SAIL.

Conclusion

  • Like all systems in sailing it is best to keep everything as simple as possible
  • The more confident you become with your trimming skills, you will find yourself trimming more or ‘changing gears’ for conditions as they vary when you are racing
  • This, added with documenting your settings in your sailing diary will see your performance improve greatly
  • For help, you OneSails loft is just a phone call away

“Sail fast and have fun!”
OneSails Team